More GLSL: Camera and Lighting
CS 481 Lecture, Dr. Lawlor
Last class, we saw how GLSL generally works. Now we're going to cover a few more specifics.
The Builtin OpenGL Matrices
OpenGL has a small set of built-in matrices and matrix manipulation
routines that are actually quite useful. As with everything in
OpenGL, you choose the current matrix to operate on using a gl...
command, in this case glMatrixMode.
There are actually only three things you can pass to glMatrixMode:
- glMatrixMode(GL_MODELVIEW); is the common case.
This makes all subsequent matrix operations affect the
"gl_ModelViewMatrix", which is primarily used for model setup (for
example, shrinking the car model to fit next to the building model).
- glMatrixMode(GL_PROJECTION); switches to the
projection matrix, "gl_ProjectionMatrix". The projection matrix's
job is usually to perform the perspective divide, but I actually often
use it for the entire camera transform; basically ViewProjection
instead of just Projection.
- glMatrixMode(GL_TEXTURE); switches to the texture
matrix. This can be used to adjust the texture coordinates you
pass in. With programmable hardware, it's usually easier to just
adjust gl_MultiTexCoord0 yourself.
The fixed-function hardware essentially performs the following GLSL code on each vertex:
gl_Position = gl_ProjectionMatrix*gl_ModelViewMatrix*gl_Vertex;
As usual, with programmable shaders you can do exactly this, or whatever else you like!
OpenGL Matrix Manipulation
OpenGL has a whole slew of useful utility routines that act on the current matrix (as set by glMatrixMode):
-
glLoadIdentity();
Cleans out the current matrix, replacing it with the identity, like "M=mat4(1.0);".
-
glMultMatrixf(&newMat[0][0]);
Multiplies the current matrix by a new, column matrix, replacing "M" with "M*newMat". Works great with C++ mat4 objects.
-
glTranslatef(dx,dy,dz);
Shifts the origin of the current coordinate system.
-
glScalef(sx,sy,sz);
Scales the current coordinate system. Scaling by a big value
makes stuff bigger. You can also mirror stuff by scaling by a
negative value.
-
glRotatef(ang,x,y,z);
Rotate by ang degrees right-handed around the vector x,y,z. For
example, glRotatef(45.0,0,0,1); rotates the stuff onscreen by 45
degrees counterclockwise. -
gluPerspective(90.0, /* <- Y camera field-of-view, in degrees */
	glutGet(GLUT_WINDOW_WIDTH)/(float)glutGet(GLUT_WINDOW_HEIGHT), /* viewport's aspect ratio */
	0.01, /* Near clipping plane depth */
	100.0 /* Far clipping plane depth */
);
Multiply in a perspective-divide matrix. Do be careful about the
near and far range--geometry closer or farther than these distances
gets clipped away, but if you make the ratio
of these too big you get Z-buffer roundoff errors (Z buffer
fighting!). This divide almost always goes into the GL_PROJECTION
matrix.
-
gluLookAt(e.x,e.y,e.z, o.x,o.y,o.z, u.x,u.y,u.z);
Multiply in a matrix that will make the camera sit at e, looking toward
o, with an "up vector" of u. A typical frame setup is
glLoadIdentity, gluPerspective, and gluLookAt.
There are lots of other routines. In C++ you can also extract the matrix values and hand-manipulate them if you like:
	mat4 p; /* stores the Projection matrix */
	glGetFloatv(GL_PROJECTION_MATRIX,&p[0][0]); /* read back the projection matrix */
	mat4 t=mat4(1.0); /* soon to be a Translation matrix */
	t[3].z += dz; /* set translation offset */
	p=p*t; /* multiply projection matrix by translation matrix */
	glLoadMatrixf(&p[0][0]); /* copy new matrix into OpenGL */
Pushing and Popping Matrices
The coolest thing about OpenGL matrices is pushing and popping.
Let's say to draw one little piece of your world, you need to translate
and scale the coordinate system. Then to draw some other piece,
you need to go back to the original coordinate system, and translate
and scale differently. OpenGL makes this easy with glPushMatrix
and glPopMatrix, which save the current matrix onto a little
OpenGL-internal stack.
	glPushMatrix(); /* save old coordinate system */
	glTranslatef(model1.origin.x,model1.origin.y,model1.origin.z);
	model1.draw();
	glPopMatrix(); /* restore old coordinate system */

	glPushMatrix(); /* save old coordinate system */
	glTranslatef(model2.origin.x,model2.origin.y,model2.origin.z);
	model2.draw();
	glPopMatrix(); /* restore old coordinate system */
After this piece of code, the matrix is unchanged. Without the
pushes and pops, you'd be translated by model1.origin + model2.origin.
Setting Up the Builtin OpenGL Matrices
The usual way to initialize the builtin OpenGL matrices is with a
little chunk of code at the start of each frame, in the "display"
routine. You've got to at least set up the perspective divide
and the camera orientation. My matrix setup code usually looks like
this:
	// Load all needed matrices into OpenGL:
	glMatrixMode(GL_PROJECTION);
	glLoadIdentity(); /*<- clean out any old leftover matrices */
	gluPerspective(90.0, /* <- Y camera field-of-view, in degrees */
		win_w/(float)win_h, /* viewport's aspect ratio: always width over height */
		0.01, /* Near clipping plane depth */
		100.0 /* Far clipping plane depth */
	);
	/* if you're not Dr. Lawlor, you'd switch to GL_MODELVIEW here */
	gluLookAt(VEC3_TO_XYZ(camera_location),
		VEC3_TO_XYZ(camera_location + camera_direction),
		VEC3_TO_XYZ(camera_upvector));

	glMatrixMode(GL_MODELVIEW);
	glLoadIdentity();
It's INCREDIBLY IMPORTANT that you begin each frame with a glLoadIdentity for each MatrixMode, because:
- OpenGL doesn't reset the matrices after every frame, so it's easy to end up with horribly bizarre matrices, where you're perspective dividing over and over again. (Try this! It's hideous!)
- MPIglut (which we'll discuss in February) overrides glLoadIdentity to add its subwindow matrix.
Note that above I'm using my handy "VEC3_TO_XYZ" macro:
/* Convert a struct with .x, .y, .z fields into three arguments */
#define VEC3_TO_XYZ(v) (v).x,(v).y,(v).z
Matrix Setup Heresy
Some people prefer putting the GL_PROJECTION setup inside the reshape
routine. This is a bad idea, because some versions of GLUT don't
call your reshape routine until the window is actually reshaped.
Plus, this makes it much tricker to animate, e.g., the camera
field-of-view.
Other people prefer putting only the perspective divide (gluPerspective) in the
GL_PROJECTION matrix, not gluLookAt like me. This approach works with the fixed-function
hardware's (horribly ugly) per-vertex lighting, which for specular
lighting assumes the post-GL_MODELVIEW camera is sitting at the origin
(fixed-function lighting happens in eye space). Again, with
programmable shaders, you can do anything you like--and I like doing
lighting in world space, which is easiest if the *whole* camera
transformation is in the GL_PROJECTION matrix.
So I'm something of a matrix heretic--I treat GL_MODELVIEW and
GL_PROJECTION like they were actually GL_MODEL and
GL_VIEWPROJECTION. This means my matrices don't work with the
fixed-function OpenGL specular lights, but fixed-function lights are both painful and
ugly. I prefer per-pixel specular lighting--see below!
Normal Matrix
Normals are funny. They're vec3's, since you don't want
perspective on normals. And they don't actually scale quite
right--a 45 degree surface with a 45 degree normal, scaled by
glScalef(1,0.1,1), drops the surface down to near 0 degrees, but
actually tilts the normal *up*, in the opposite direction from the
surface, to near 90 degrees.
Mathematically, if between two points a and b on the surface,
dot(n,b-a)==0 (which is to say, the normal is perpendicular to the
surface), then after applying a matrix M to the points, you want
the normal to still be perpendicular. The question is, what
matrix N do you have to apply to the normal to make this happen?
In other words, find N such that
dot( N * n , M * a - M * b) == 0
We can solve this by noting that dot product can be expresed as matrix
multiplication--dot(x,y) = transpose(x) * y, where we treat an ordinary
column-vector as a little matrix, and flip it horizontally. So
transpose(N * n) * (M*a - M*b) ==
0 (as above, but write
using transpose and matrix multiplication)
transpose(N * n) * M * (a-b) ==
0
(collect both copies of M)
transpose(n) * transpose(N) * M * (a-b) ==
0 (transpose-of-product is product-of-transposes in
opposite order)
OK. This is really similar to our assumption that the original
normal was perpendicular to the surface--that dot(n,b-a) ==
transpose(n) * (a-b) == 0. In fact, the only difference is the
new matrices wedged in the middle. If we pick N to make the term
in the middle the identity, then our new normal will be perpendicular
to the surface too:
transpose(N) * M == I (the identity matrix)
This is the definition for matrix inverses, so the "normal matrix" N = transpose(inverse(M)).
Try it! If you have a weird non-uniform scaling, multiplying
gl_Normal by the gl_ModelViewMatrix gives you normals that are clearly
bad, while multiplying by gl_ModelViewMatrixInverseTranspose is clearly
correct! In GLSL,
	myNormalBad = normalize(vec3(gl_ModelViewMatrix * vec4(gl_Normal,0.0)));
	myNormalOK = normalize(vec3(gl_ModelViewMatrixInverseTranspose * vec4(gl_Normal,0.0)));
	myNormalHandy = normalize(gl_NormalMatrix * gl_Normal);
If you look up the GLSL definition for the handy "gl_NormalMatrix", it's defined
as "the transpose of the inverse of the 3x3 submatrix of gl_ModelViewMatrix". Now
you know why!
GLSL "uniform" Variables: Smuggling Data into GLSL from C++
To do specular lighting, we need to know where the camera is.
Only C++ knows this. Luckily, you can smuggle data from C++ into
GLSL using a GLSL "uniform" variable.
Inside your GLSL (vertex or fragment) shader, you declare a uniform variable just like a 'varying' variable:
uniform vec3 cameraLoc;
After compiling, from C++ you can set this uniform variable. You
do this by passing it's string name to "glGetUniformLocationARB", which
returns an integer index (into a table of variables somewhere in the
guts of your graphics card). You can then set a "vec3" uniform's
value by passing the uniform's location to glUniform3fvARB (or set a
vec4 with glUniform4fvARB, etc). Here I'm passing one (1)
float-pointer as the camera location, which I've named
"camera_location" in C++:
	glUseProgramObjectARB(prog);
	glUniform3fvARB( /* set the "cameraCoords" uniform variable */
		glGetUniformLocationARB(prog, "cameraLoc"),
		1, /* <- number of variables to set (just one vec3) */
		camera_location /* C++ variable new uniform value is read from */
	);
Make sure your program is still bound in use before you try to set
uniform variables; the "glUseProgramObjectARB" above is only needed
once, but it is needed!
Examples of Lighting
There are several kinds of lighting we'll try out here:
- Diffuse: light that reflects off the surface equally in all directions. Also known as Lambertian.
- Specular: light that glances off the surface mostly in the mirror-reflection direction. "Shininess"
- Indirect: light arriving from other nearby surfaces. Not yet easy to compute in realtime!
- Ambient: constant approximation of indirect light.
To actually render lighting, you first need a whole set of unit-length direction vectors starting at the point on the
surface you're shading. In your GLSL fragment shader:
	vec3 N = normalize(normal); // Points away from surface
	vec3 L1 = normalize(vec3(0,1,0)); // Points toward light 1
	vec3 C = normalize(vec3(cameraloc)-position); // Points toward camera
	vec3 H1 = normalize(C+L1); // Blinn's 'halfway vector' for light 1
Then you need to compute (clamped) dot products between these vectors:
	float a=0.2; // Ambient illumination
	float d=clamp(dot(N,L1),0.0,1.0); // Diffuse light fraction
	float s=pow(clamp(dot(N,H1),0.0,1.0),50.0); // Specular fraction.  Constant controls highlight size
And finally you just combine these together--you can get lots
of different effects by combining them in different ways. Here
I've added in "M" for the object ("Material") color, and "K" for a checkerboard pattern.

a- Ambient, 0.2
|

d- Diffuse, dot(N,L)
|

M- Material Color, gl_Color
|

s- Specular, pow(dot(N,H),...)
|

M*a
Typical Pure Ambient
|

M*d
Typical Pure Diffuse
|

M*(d+a)
Typical Lambertian
|
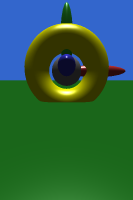
M*(d+a)+s
Classic Phong Lighting
|
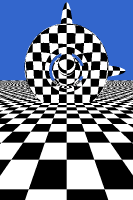
K- Checkerboard, using step(fract(position))
|
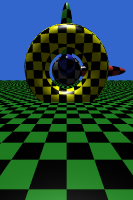
K*M*(d+a)+s
Checkerboard controls overall diffuse color.
|
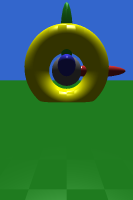
M*(d+a)+K*s
Checkerboard controls shininess.
|
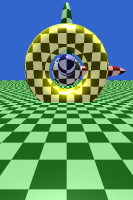
M*(d+a)+s+0.5*K
Gently glowing checkerboard.
|
Try these out with the 481_lighting example program on the main page!


